
Wymac Kiosk - Installation Manual


Wymac Gaming Solutions
26 Hamilton Street, Oakleigh, Victoria 3166, Australia
Disclaimer: Wymac Gaming Solutions is not responsible for any damages, injuries, or equipment malfunctions resulting from improper installation, handling, or use of the Kiosk product. Always adhere to safety guidelines and consult a professional if unsure about any installation or operational procedure.
Kiosk Product Safety Disclaimer
Important Safety Instructions Please read and follow these safety instructions carefully before using or installing the Kiosk product to avoid potential hazards and ensure safe operation. Failure to comply with these safety guidelines may result in injury, equipment damage, or other unsafe conditions.


Electrical Safety
Power Supply: Ensure the Kiosk is connected to a properly grounded electrical outlet with the correct voltage (240V AC). Do not connect the product to an incompatible power source.
Power Cords: Use only the power cords supplied by the manufacturer. Do not modify or extend the power cords. Inspect the power cords for signs of damage during transit and look for wear, and replace them if necessary.
Moisture: Do not expose the Kiosk to liquids, rain, or high humidity. Electrical shock or fire hazards can occur if the product becomes wet. In case of liquid contact, disconnect the power immediately.
Ventilation: Ensure that ventilation openings are not obstructed to prevent overheating. Keep the Kiosk in a well-ventilated space during operation.
Overloading: Avoid overloading electrical outlets or extension cords, as this may result in fire or electrical shock.
Disconnect Before Servicing: Always disconnect the power supply before servicing, cleaning, or performing maintenance on the Kiosk.
Weight and Handling Safety
Weight Limit: The Kiosk unit is heavy. Always ensure that at least two people are involved in lifting or moving the unit. Use appropriate lifting techniques or mechanical aids to prevent personal injury or damage to the equipment.
Installation Surface: Ensure the surface where the Kiosk is installed is stable, level, and capable of supporting its weight. Avoid placing the Kiosk on an uneven surface that could lead to tipping or damage.
Avoid Sharp Edges: The Kiosk may have sharp edges on certain components. Wear appropriate safety gloves when handling the unit to avoid cuts or injuries.
Moving Parts: The Kiosk contains mechanical components that may pose a risk of pinching or crushing. Keep hands and fingers clear of moving parts when operating or servicing the product.
Table of Contents
Introduction
The Kiosk is prebuilt at the Wymac facility and is designed for plug-and-play use in a venue environment. This manual will guide you through identifying the key components, performing basic setup, and troubleshooting common issues in the field.

Wymac Kiosk
Identifying Kiosk Components
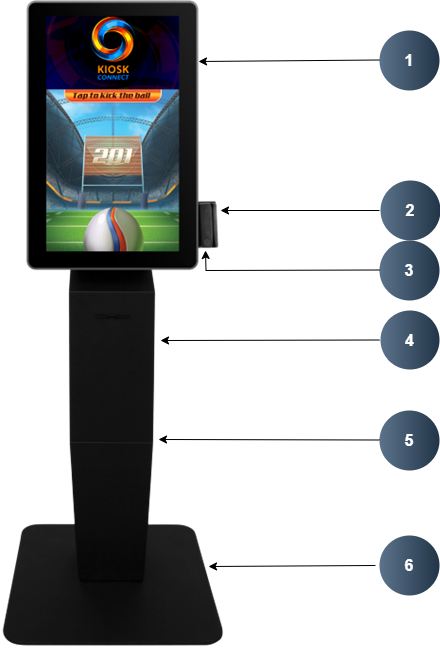
Kiosk Screen: The touchscreen interface for user interaction.
Mag Card Reader: Located on the front panel for reading magnetic stripe cards.
Bar Code Scanner: Located beneath the Magnet etic stripe card Reader.
Custom Printer Chute: Installed in the Chassy for receipt or ticket printin
Front Door: Access to Printer, Paper roll
Base Plate: Stabilizes the Kiosk
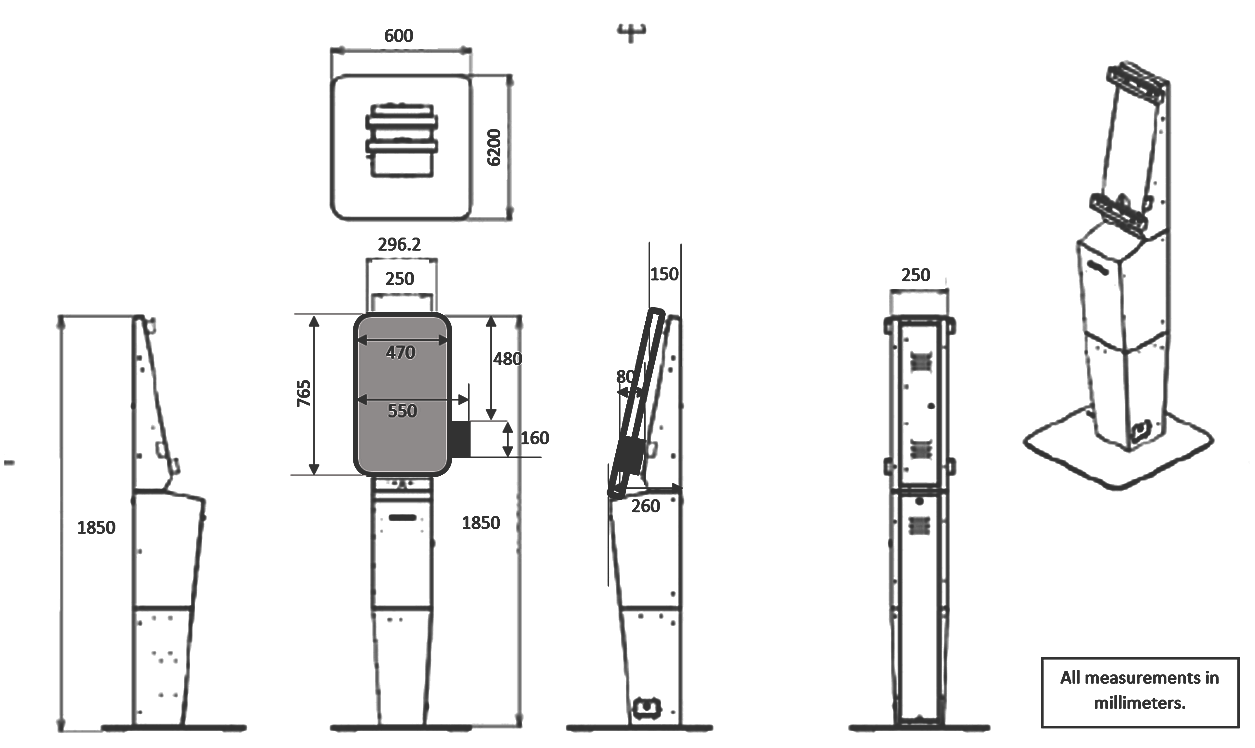
Kiosk Dimensions
Unpacking and Initial Inspection
Inspect the unit for any visible damage during transit.
Check the packaging for a bag with Keys for the Switch and the Door.
Setting Up the Kiosk on Site
Positioning the Kiosk
Place the kiosk in its designated location.
Ensure the surface is stable and that there is enough ventilation around the unit.
Power and Network connection for the Kiosk
Plug the power cord into a Power wall socket.
Plug the RJ45 (Ethernet) cable into the designated Network socket Visible to Wymac’s Operations Team.
Turn on the main power switch located at the back of the unit.
Verify that the screen lights up and Window ® boots up.
Kiosk Hardware Access Details
Keys – To access the locked sections of the Kiosk
Font Door
Printer access
Change printer paper
Side Door (Top Left)
Access to peripherals USB cables
Access to turn the screen/PC off and on (Large red switch)
Access to reboot button (Round red button)
Side Door (Bottom right)
Access to Main Power switch for entire Kiosk
Rear Door (Bottom)
Access to the PSU main switch
Rear Door (Top)
Access to rear fans
Access to feeding cables to touchscreen
Power Switches
To be used to power down for relocation (power down and power up)
To be used to power off if application is not responding (initially under Wymac guidance)
Printer Access
To change paper
Kiosk Commissioning Process
Once powered on, the Kiosk Screen will automatically load Windows.
Observe the Screen and for the Wymac Connect Logo.
Verify that the screen responds to touch inputs.
Verify Mag Card Reader is functioning by swiping a test card.
Verify Barcode Reader is functioning by Scanning a test card.
Test the printer by printing a test ticket using the Audit Menu (see Accessing Audit Menu in Section 11).
Once the Kiosk is online:
Wipe the touchscreen with a microfiber cloth and Windex Spray to clean from dirt and finger marks.
Wipe any dust or dirt from the Kiosk Chassy.
Remove any dirt around the Kiosk installation area and leave it neat.
Get Sign off from the customer Contact at the venue for completion and call Wymac Support once the Kiosk is commissioned before leaving the venue.
Troubleshooting Guide
Power Issues
Open the Front Door and the Side Door.
Inspect and Verify that cables and connections are properly attached:
Power cord connected to the Dell Mini PC.
USB cables connecting the Mag Card Reader, Barcode Scanner and Printer to the Mini PC.
Display cable connected between the screen and the Mini PC.
No Power to the Unit
Ensure the power cord is plugged in properly.
Check the power outlet for functionality.
Inspect the main power switch on the back of the unit.
The Unit Powers On but the Screen Stays Off:
Check the connection between the screen and the Dell Mini PC.
If the screen still doesn’t power on, Turn off using the power button on the screen and Turn on after 5 seconds.
Touchscreen Not Responding
Ensure that no protective film or debris is interfering with the touch interface.
Restart the Dell Mini PC by holding down the power button for 10 seconds and turning it back on.
If the issue persists, verify the connection between the screen and the Mini PC.
Magnetic Card Reader Not Functioning
Magnetic Card Not Detected:
Ensure the card is swiped correctly with the magnetic stripe facing the reader.
Check the USB connection from the Mag Card Reader to the Mini PC.
Restart the Mini PC if the issue persists.
Barcode Reader Not Functioning
Barcode Not Detected:
Ensure the Scanner is online, by checking the Scanning Rays are active on the Barcode Scanner, by placing your hand directly beneath the Scanner.
Check the USB connection from the Barcode Scanner to the Mini PC.
Restart the Mini PC if the issue persists.
Printer Malfunction
Printer Not Printing:
Ensure the printer has paper loaded.
Check the USB connection between the printer and the Mini PC.
Verify the printer is powered on and properly configured in the operating system.
Print Quality Issues:
Clean the printer head if smudging occurs.
Ensure that paper is properly aligned and free from obstructions.
Network Connectivity Issues
Ensure the Ethernet cable is securely connected to the Mini PC and the network port.
Restart the router or check with the network administrator for potential outages.
Restart the Kiosk
Only under guidance from Wymac support
Open side door and press and hold the red round button for 5 seconds.
Regular Maintenance
Cleaning:
Wipe the touchscreen with a microfiber cloth to avoid dirt and scratches.
Keep the card reader slot clean to prevent dust accumulation.
Software Updates:
Wymac Support would manage Kiosk Software updates remotely as per the Valid Software Licensing agreement.
Contact Information
For technical support or service inquiries, contact Wymac Support:
Phone: 1300 994 827
Email: support@wymac.com.au
Audit Menu and Testing
Tools and Equipment Needed for Kiosk Installation
Basic Hand Tools:
Phillips/Flat Head Screwdriver: For securing screws and components during assembly.
Allen Wrench Set: For assembling specific parts of the kiosk.
Adjustable Wrench: For tightening nuts and bolts.
Power Tools:
Cordless Drill: For fastening screws and bolts during the installation process.
Drill Bits Set: Appropriate sizes for any necessary drilling.
Measuring and Alignment Tools:
Level: To ensure the kiosk is installed evenly and properly aligned.
Measuring Tape: For accurate measurement of space and positioning.
Cleaning and Maintenance Tools:
Windex or other glass cleaner: To clean the display screen and glass surfaces.
Rag (lint-free): For wiping down surfaces without leaving streaks or residue.
Portable Vacuum: To clean dust and debris from installation areas, especially inside the kiosk unit.
Portable Blower: To remove dust from fans and other delicate parts and electronic components.
Cabling and Electrical Tools:
Cable Ties: For organizing and securing cables inside the kiosk (if needed).
Wire Strippers: For any necessary cable modifications.
Multimeter: To check electrical connections and ensure proper power supply.
Documentation:
Wymac Kiosk - Install Manual: For reference during the installation process.
These tools and equipment will ensure a smooth and safe installation process for the Kiosk unit.
Install Checklist
Link to online form with Check list?
site name: | site contact: |
|
|
|
|
|
|
Installer Name | Date/Time of Arrival | Date/Time of Completion | Install Completed Yes/No |
|
|
|
|
Tasks to be Performed as Training for the Venue Contact
Task | Function | Comments (if any) | Checked (Yes/No) |
Kiosk Keys
| Open doors on the Kiosk to gain access to certain areas. Try to open the Doors using the Keys |
|
|
Power Switches
| Turn certain parts or the whole Kiosk off or on. Turn off/on the main switch to check. |
|
|
Printer – Add paper
| Add paper roll and then Print vouchers from the Kiosk and check. |
|
|
Card swipe
| Swipe a Magnetic card to check the card reader is functional. |
|
|
Barcode Reader
| Scan barcode from a docket to check barcode reader is functional |
|
|
Restart the Kiosk
| Use the Power Switch to Turn off the Kiosk and Turn it back on to ensure it Boots up after a power off. |
|
|
Installer name:
Signature:
Venue Contact signature: